
Overview
Custom Form Builder is a Magento 2 extension from Magexweb that lets you build contact forms, quote requests, product enquiries, applications, registrations and surveys in the Magento admin, without code, and show them anywhere on your store: on their own page, in CMS pages and blocks, and on product pages.
Forms are made of fields placed on a 12-column grid. A form can have one step or several steps with a progress header. Conditions show, hide or require fields, and skip whole steps, depending on the answers. Every answer is checked in the browser and again on the server, and submissions are stored in Magento, emailed, or both.
Important: Uploaded files are stored outside the public web folder (var/mxw_forms) under random names and are only delivered to admins with the Submissions permission or to the customer who sent them. Magento cron must run: it removes uploads that were never submitted and applies the retention period.
Key features
- Drag-and-drop builder with 26 field types: text, email, phone, number, date and time, choices, Select2, star rating, rich text, address with autocomplete, country and state, file and image upload, consent, captcha, headings and HTML
- Separate field widths for desktop, tablet and mobile on a 12-column grid
- Multi-step forms with numbered steps, a progress bar or tabs, per-step buttons and step skip rules
- Conditions: show, hide or require fields, and skip steps, when answers match (all or any rule)
- Validation in the browser and on the server: lengths, patterns, number and date ranges, number of choices, "after another field" and "matches another field"
- Product enquiry forms: a button below Add to Cart that opens a popup, or a product tab, for all products, selected categories or selected products
- CMS widget for pages and blocks, and a block for layout XML
- Spam protection: honeypot, minimum fill-in time, submissions per visitor per hour and Magento's own Google reCAPTCHA
- Emails: admin notifications, conditional recipients, a copy to the customer, editable templates, sent right away or through the message queue
- Submissions grid with the form's answers as columns, statuses, assignment, internal notes, CSV and Excel export
- My Account > My Submissions for logged-in customers
- Privacy tools: hashed or truncated IP addresses, retention per form, anonymizing and a right-to-erasure command
- Full page cache support, granular admin permissions and a REST API
How it works
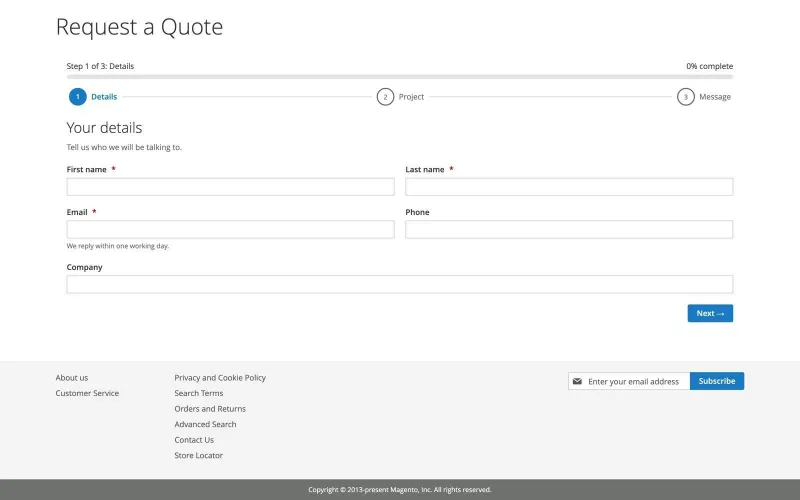
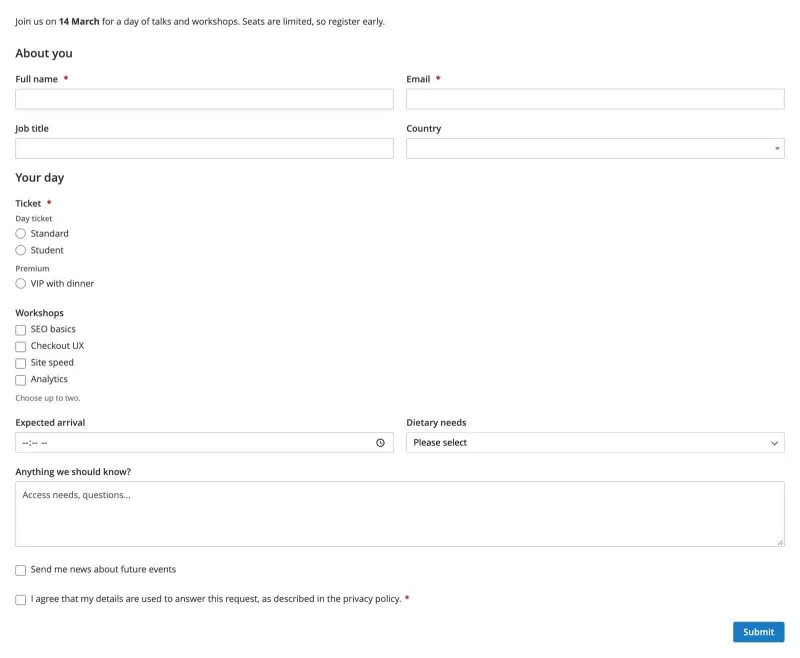
You build a form in Form Builder > Forms, choose the store views and customer groups that may use it, and show it on its own page, in a CMS page or block, or on product pages. A multi-step form shows a progress header with the steps and the percentage completed:
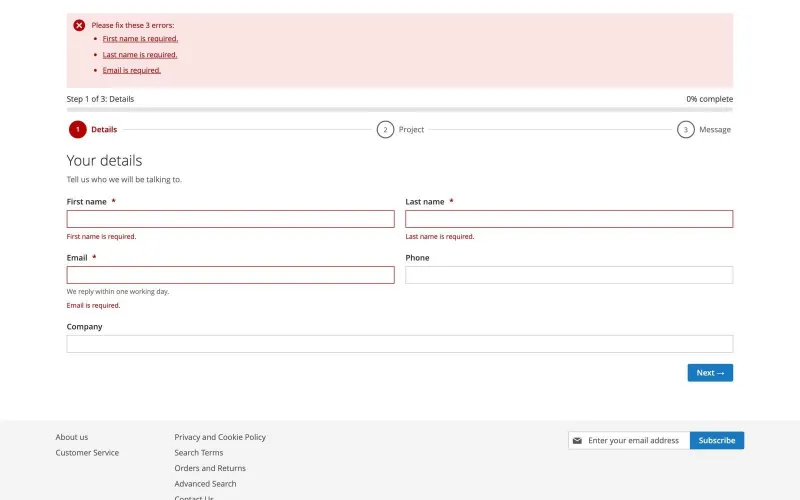
When a required field is empty or an answer is not valid, the customer sees the message next to the field and a summary at the top:
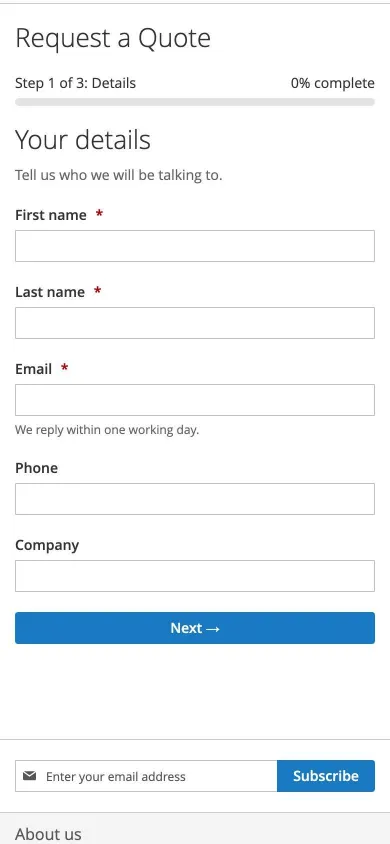
On phones, fields use the full width of the screen and the buttons stack:
Every submission appears in Form Builder > Submissions, where you read the answers, download files, change the status and add internal notes.
Requirements and compatibility
- Magento Open Source or Adobe Commerce 2.4.7, 2.4.8 or 2.4.9
- PHP 8.2 to 8.5, as supported by your Magento version
- Luma, Blank and Luma-based themes
- Magento cron, which removes unsubmitted uploads, applies retention and sends queued emails
Installation
Composer installation (recommended)
- Place the extension in your project: through the Adobe Commerce Marketplace, a private Composer repository, or by copying it under
app/code. - From the Magento root, run the commands below.
| Command | Purpose |
|---|---|
composer require magexweb/formbuilder | Only if installed from a Composer repository |
php bin/magento module:enable Magexweb_FormBuilder | Registers and enables the module |
php bin/magento setup:upgrade | Creates the Form Builder tables and the example form |
php bin/magento setup:di:compile | Recommended for production mode |
php bin/magento setup:static-content:deploy -f | Required in production mode |
php bin/magento cache:enable mxw_forms | Enables the Form Builder cache type (storefront form definitions) |
php bin/magento cache:flush | Clears the Magento cache |
Manual (ZIP) installation
- Extract the ZIP package to
app/code/Magexweb/FormBuilder, so thatapp/code/Magexweb/FormBuilder/registration.phpexists. - Run the same
bin/magentocommands as above. - Check that the module is active:
php bin/magento module:status Magexweb_FormBuilder
After installing
- Make sure Magento cron runs (
php bin/magento cron:install). It deletes uploads that were never submitted, applies retention and, with queued email delivery, sends the emails. - Magento enables new cache types only on a fresh installation, so enable
mxw_formsas shown above. Forms work without it, but each page view then loads the form from the database. - An example form, Contact us, is installed inactive. Open it to see how a form is put together.
- Check the email sender and the admin recipients in the configuration.
Note: Form pages are at /forms/{code}, for example /forms/contact-us. A URL rewrite can take over the path.
Admin configuration
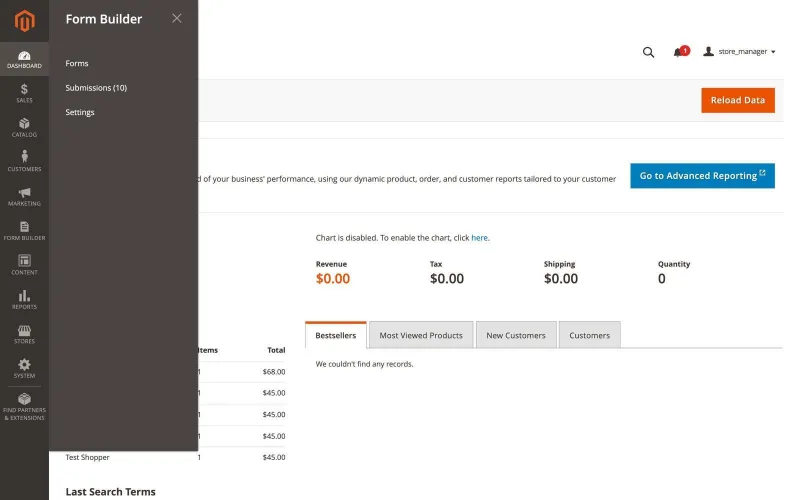
The extension has its own Form Builder item in the admin menu, with Forms, Submissions (with the number of new submissions) and Settings:
All settings live under Stores > Settings > Configuration > Magexweb Extensions > Form Builder, also available from Form Builder > Settings. Use the scope switcher at the top of the page for different settings per website or store view.
General
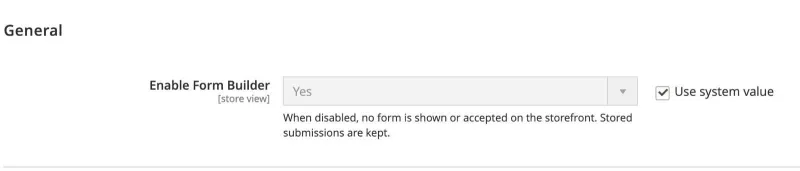
| Field | Description |
|---|---|
| Enable Form Builder | Master switch. Set to No to hide every form and refuse submissions in this store view. Stored submissions are kept. Scope: store view. Default: Yes |
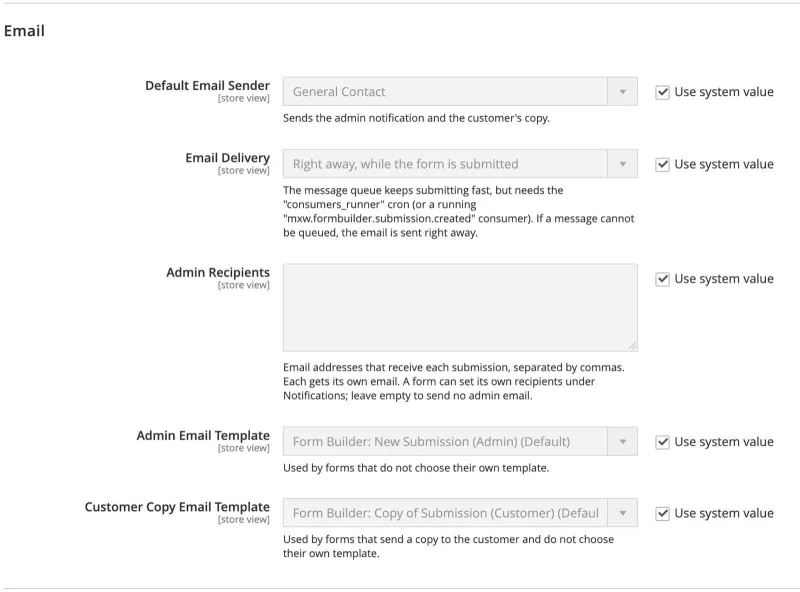
| Field | Description |
|---|---|
| Default Email Sender | Sender of the admin notification and of the customer's copy. Scope: store view. Default: General Contact |
| Email Delivery | Right away, while the form is submitted, or through the message queue. The queue keeps submitting fast but needs the consumers_runner cron (or a running mxw.formbuilder.submission.created consumer). If a message cannot be queued, the email is sent right away.Default: Right away |
| Admin Recipients | Email addresses that receive each submission, separated by commas (up to 20). Each gets its own email. A form can set its own recipients under Notifications. Leave empty to send no admin email. Default: (empty) |
| Admin Email Template | Used by forms that do not choose their own template. Default: Form Builder: New Submission (Admin) |
| Customer Copy Email Template | Used by forms that send a copy to the customer and do not choose their own template. Default: Form Builder: Copy of Submission (Customer) |
Address autocomplete
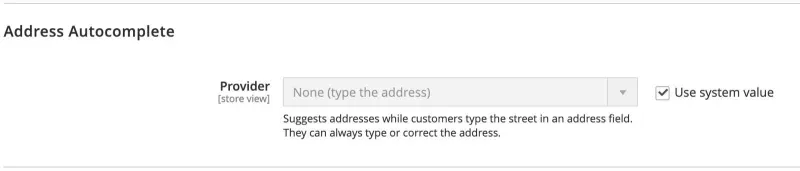
| Field | Description |
|---|---|
| Provider | Google Places, or none. Suggests addresses while customers type the street in an Address field; they can always type or correct the address. Default: None |
| Google Maps API Key | Shown when the provider is Google. A browser key, visible in the page: in the Google Cloud console, restrict it to your store's domains (HTTP referrers) and to the Places API (New) and Maps JavaScript API. Default: (empty) |
Privacy
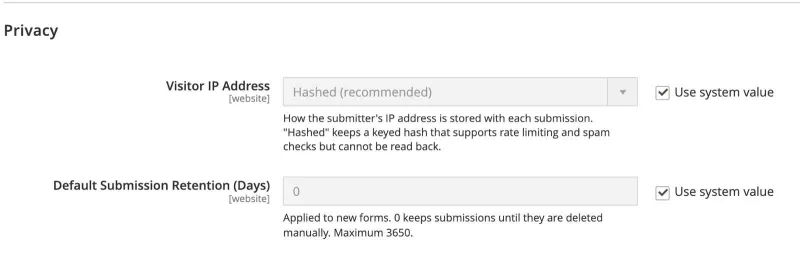
| Field | Description |
|---|---|
| Visitor IP Address | How the submitter's IP address is stored: Hashed (a keyed hash that supports rate limiting but cannot be read back), Truncated, or Do not store. Scope: website. Default: Hashed |
| Default Submission Retention (Days) | Applied to new forms. 0 keeps submissions until they are deleted. Maximum 3650. Scope: website. Default: 0 |
Google reCAPTCHA
Form Builder uses Magento's own reCAPTCHA. Turn it on under Stores > Configuration > Security > Google reCAPTCHA Storefront > Storefront > Enable for Form Builder Forms and choose the type (checkbox, invisible or v3); the keys are Magento's. Each form can turn it off under Spam & Limits.
Forms
Manage forms in Form Builder > Forms. The grid shows each form's code, status, store views, number of submissions and unread submissions. Use Select > View to open an active form on the storefront, and the Actions menu to enable, disable or delete several forms at once.
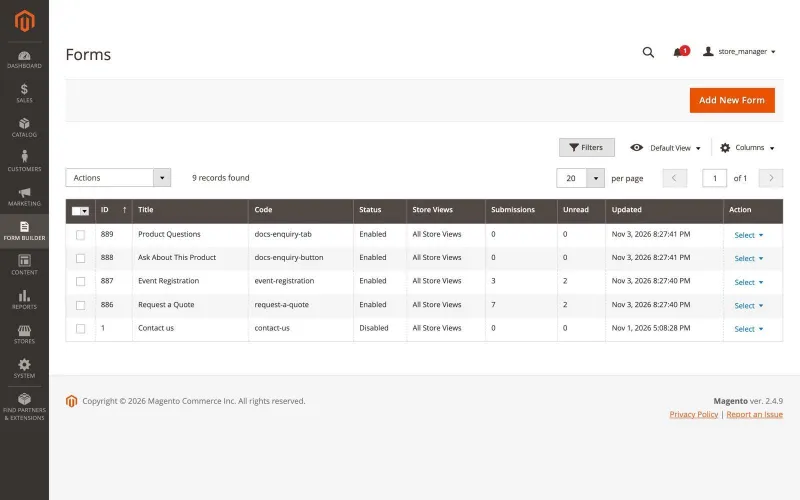
Note: Deleting a form keeps its submissions, with the form title as it was when they were submitted. Use retention or delete the submissions to remove them.
General
Click Add New Form. The General section decides what the form is called, where it lives and who may use it:
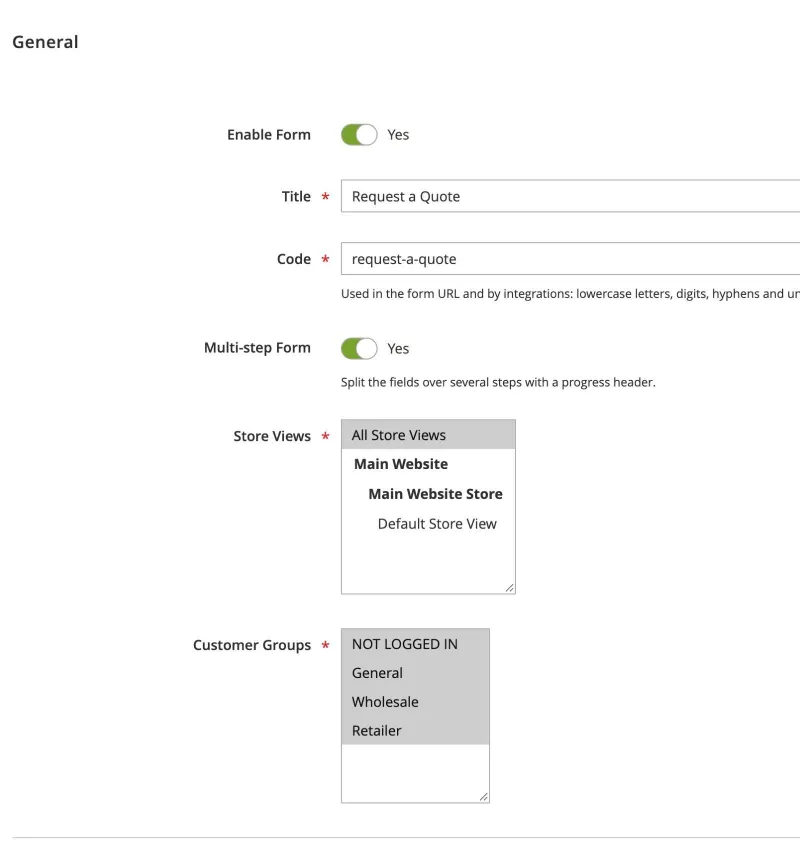
| Field | Description |
|---|---|
| Enable Form | Inactive forms are not shown: their page shows "Page not found" and a widget shows nothing. |
| Title | Shown to customers as the page title and the popup or tab heading. |
| Code | Used in the form address (/forms/{code}) and by integrations: lowercase letters, digits, hyphens and underscores. |
| Multi-step Form | Splits the fields over several steps with a progress header (see Multi-step forms). |
| Store Views | All Store Views or specific store views. |
| Customer Groups | Groups that may use the form. Include NOT LOGGED IN for guests. |
Click Save, then Preview to try the form. The preview opens the last saved version in a new tab, whatever its status; the link works for one hour and nothing is saved.
The builder
The Builder section has the field palette on the left, the form in the middle and the settings of the selected field or step on the right. Click a field type to add it after the selected field (or at the end of the selected step), or drag it onto the form. Drag fields to reorder them or to move them between steps: drop on the top or bottom half of a field to put it before or after it, on its right edge to put the two side by side, or on a step header to put it first. The arrow buttons on a field move it one place, or straight to the top or bottom of its step.
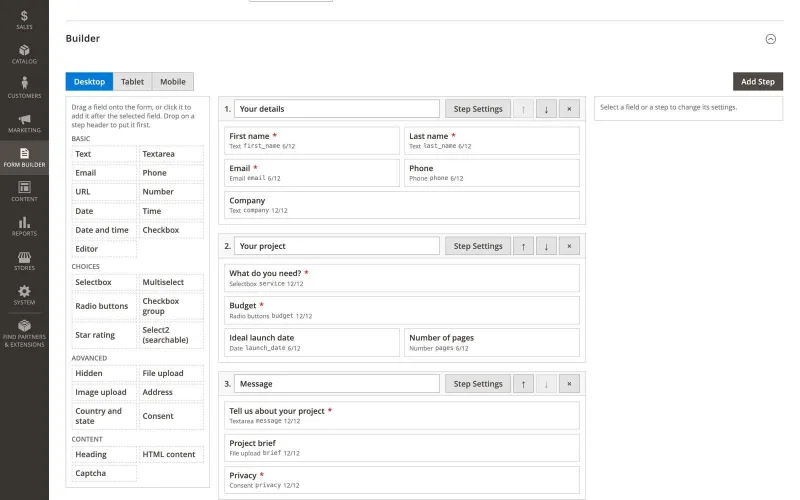
- Desktop / Tablet / Mobile: switch the device at the top to set each device's field widths. Drag a field's right edge (or focus it and use the arrow keys) to change its width.
- The builder checks the form when you save: codes must be unique, choice fields need options, conditions must refer to fields on the same or an earlier step, and so on.
- A field's code cannot change after the form is saved, because its answers are stored under that code.
Field settings
Click a field to edit it in the panel on the right:
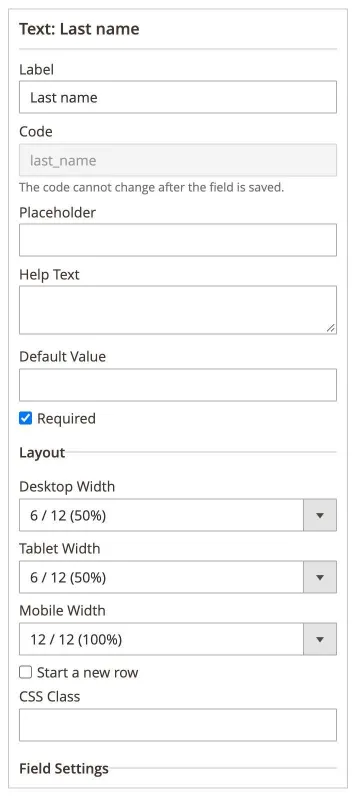
| Field | Description |
|---|---|
| Label | Shown to customers. Translate it per store view in the field panel. |
| Code | Unique code of the field; answers are stored under it. Cannot change after saving. |
| Placeholder, Help Text, Default Value | Text inside the input, text below it, and the value filled in when the form opens. |
| Required | The field must be filled in. A condition can also require it. |
| Desktop / Tablet / Mobile Width | Columns out of 12 on each device. Start a new row forces the field onto its own row. |
| CSS Class | Extra class for your theme's styles. |
| Field Settings | The settings of the field type: options, allowed file types, number of stars, address parts and so on (see Field types). |
| Validation | Rules that make sense for the type (see Validation rules). |
| Conditions | Show, hide or require the field when its rules match (see Conditions). |
| Visible to Customer | Whether the answer appears in My Account. |
| Exclude from Storage | The answer is emailed but never saved. |
Field types
| Group | Field types |
|---|---|
| Text | Text, Textarea, Email, Phone, URL, Number, Editor (rich text), Hidden |
| Date and time | Date, Time, Date and time |
| Choices | Selectbox, Radio buttons, Multiselect, Checkbox group, Select2 (searchable, optional tags), Checkbox, Star rating |
| Special | Address (with optional autocomplete), Country and state, File upload, Image upload, Consent, Captcha |
| Content | Heading, HTML content (not stored) |
Note: There is no password field: forms are not a place to collect passwords.
Options
- Add options one by one, or paste a list with one option per line as
value,label(orvalue,label,group). The value is stored; the label is what customers see. - Options that share a group show under that group's heading (Selectbox, Radio buttons, Checkbox group).
- Options Layout (Radio buttons, Checkbox group): Vertical shows the options one under another; Horizontal shows them side by side, wrapping when they do not fit.
- Only option values the field defines are accepted; anything else is refused.
Special fields
| Field | Behaviour |
|---|---|
| Phone | Checked in international format: + and the country code. |
| URL | http and https addresses with a domain name; https:// is added when missing. |
| Star rating | 3 to 10 stars (5 by default). Stored as a number, for example "4 of 5". |
| Hidden | Fills itself from a URL parameter (for example ?utm_source=newsletter), the page address or the referring page. |
| Address | Checks the country, region and postcode against your store's country settings. Under Address Parts, untick the parts you do not need (street, second street line, city, postcode, country, state); only the parts shown are asked for and checked. |
| Country and state | A country and its state/province. The state list follows the country; countries without states get a text box. Enter a country code (for example US) as the default value to preselect it, and limit the countries in Field Settings. |
| File upload, Image upload | Drag and drop or Choose files. Choose the allowed extensions, the maximum size and the number of files (see File uploads). |
| Consent | Stores the exact text and version the customer agreed to. Change the version number when you change the text. |
| Editor | Bold, italic, underline, lists and links (http, https and mailto only). Stored as cleaned HTML. |
| Captcha | Sets where the reCAPTCHA widget appears; without it, the widget appears above the buttons. |
Validation rules
Open Validation in the field panel. Only the rules that make sense for the field type are offered:
| Rule | Field types |
|---|---|
| Minimum / maximum length | Text, Textarea, Editor (visible text) |
| Pattern with your own message | Text, Textarea, Email |
| Minimum / maximum value | Number |
| Earliest / latest date (or "today") | Date, Date and time |
| Minimum / maximum number of choices | Multiselect, Checkbox group, Select2 |
| After another field (for example an end date after a start date) | Number, Date, Time, Date and time |
| Matches another field (for example confirm email) | Text, Email |
Multi-step forms
Set Multi-step Form to Yes under General. The builder then shows steps: click Add Step, drag fields between steps and use the arrows to reorder them. Each step is named "Step 1", "Step 2" and so on until you type a title in its header; customers see it above the step and in the progress header.
Step settings
Click Step Settings in a step's header to edit the rest of the step:
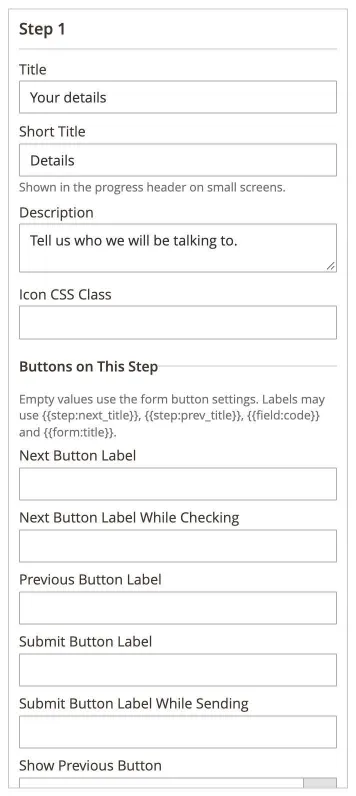
| Field | Description |
|---|---|
| Title, Short Title | Shown above the step and in the progress header. The short title is used on small screens. |
| Description | Text below the title. |
| Icon CSS Class | An icon class from your theme, shown in the progress header. |
| Buttons on This Step | Labels of Next, Previous and Submit for this step only. Labels may use {{step:next_title}}, {{step:prev_title}}, {{field:code}} and {{form:title}}. |
| Button Label Rules | Change a button label when answers match, for example "Continue as {{field:first_name}}". |
| Skip Rule | Skip the whole step when its rules match (see Conditions). |
Progress header
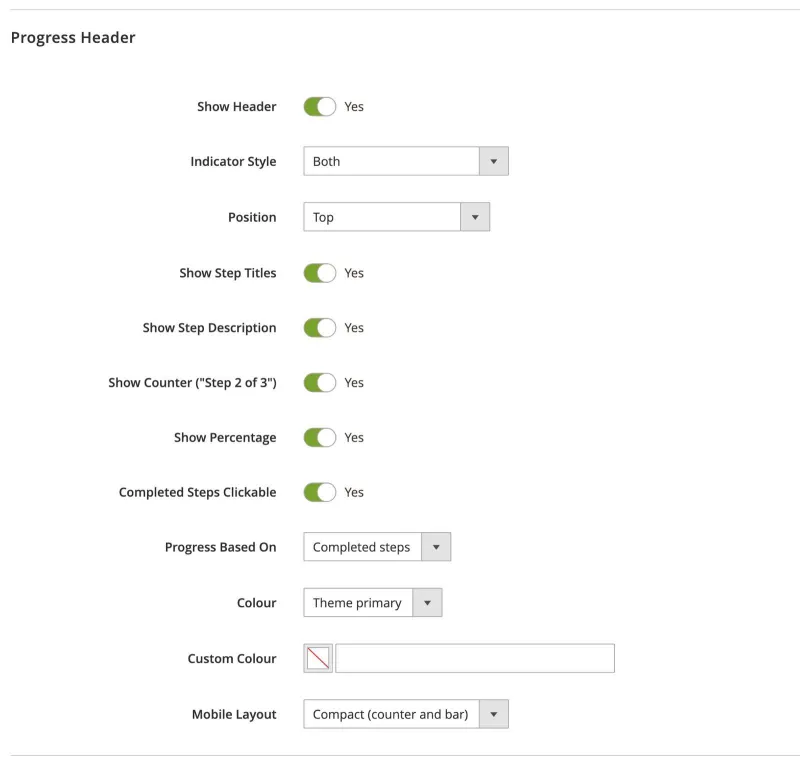
| Field | Description |
|---|---|
| Show Header | Shows the progress header above (or below) the steps. Default: Yes |
| Indicator Style | Numbered steps with titles, Progress bar only, Both, or Tabs. Default: Both |
| Position | Top, Bottom (above the buttons) or Both. Default: Top |
| Show Step Titles / Show Step Description | Shows each step's title and description. Default: Yes |
| Show Counter ("Step 2 of 3") / Show Percentage | Text above the bar. Default: Counter Yes, Percentage No |
| Completed Steps Clickable | Customers can go back to a completed step from the header. Default: Yes |
| Progress Based On | Completed steps, or the current position. Default: Completed steps |
| Colour / Custom Colour | Theme primary colour or your own. Default: Theme primary |
| Mobile Layout | Compact (counter and bar) or Full. Default: Compact |
Buttons
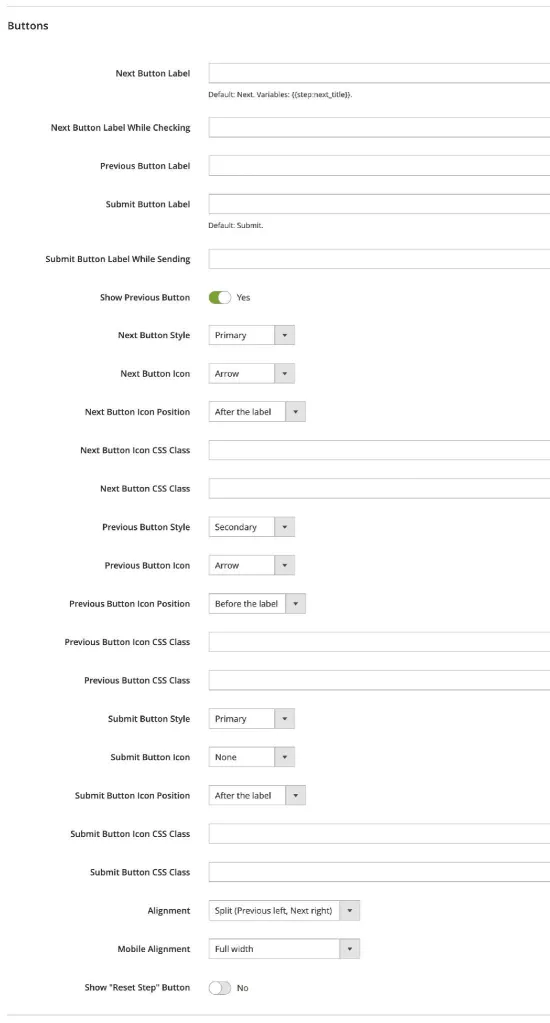
| Field | Description |
|---|---|
| Next / Previous / Submit Button Label | Labels for the whole form; steps can override them. Empty uses Next, Previous and Submit. Default: (empty) |
| ... Label While Checking / While Sending | Shown while the step is checked or the form is sent. Default: (empty) |
| Show Previous Button | Shows the Previous button on steps after the first. Default: Yes |
| Button Style, Icon, Icon Position, CSS Class | Primary, Secondary, Link or a custom class; an arrow, no icon or your own icon class, before or after the label. Default: Next and Submit primary, Previous secondary |
| Alignment / Mobile Alignment | Left, Right, Split (Previous left, Next right) or Full width. Default: Split / Full width |
| Show "Reset Step" Button | Lets customers clear the answers of the current step. Default: No |
Validation behaviour
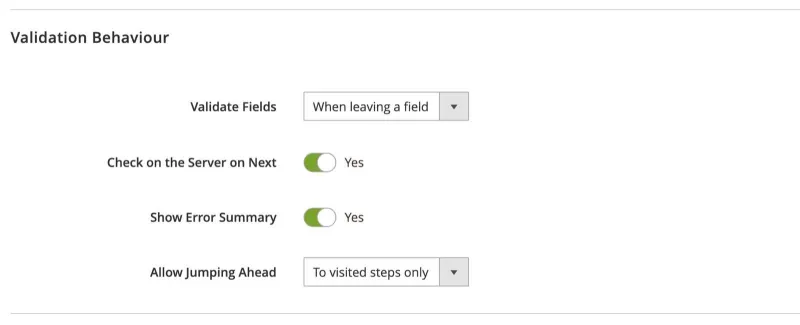
| Field | Description |
|---|---|
| Validate Fields | When leaving a field, while typing, or only on Next. Default: When leaving a field |
| Check on the Server on Next | Next also asks the server to check the step before moving on. Default: Yes |
| Show Error Summary | A list of the errors at the top of the step, with links to the fields. Default: Yes |
| Allow Jumping Ahead | No, or to steps the customer has already visited. Default: To visited steps only |
Note: Customers never lose their answers when they go back. On Submit, every shown step is checked again in the browser and on the server.
Conditions
Conditions make a form react to the answers given.
- Field conditions (field panel > Conditions): show, hide or require a field when its rules match. For example: show Company name when Customer type equals Business.
- Step skip rules (Step Settings): skip a whole step when its rules match. Skipped steps disappear from the progress header and their answers are not sent.
- Rules compare another field with a value: equals, does not equal, is one of, is not one of, contains, is empty, is not empty, greater than, less than. Choose whether all or any rule must match.
- Country and state and Address fields compare by country: pick the country from the list, or for "is one of" enter country codes such as US, CA.
- A condition can only use fields on the same step or an earlier step, so the answer is known when the condition is checked.
Note: Hidden fields and skipped steps are never checked and their answers are not saved, so a hidden required field never blocks a customer.
After submit and My Account
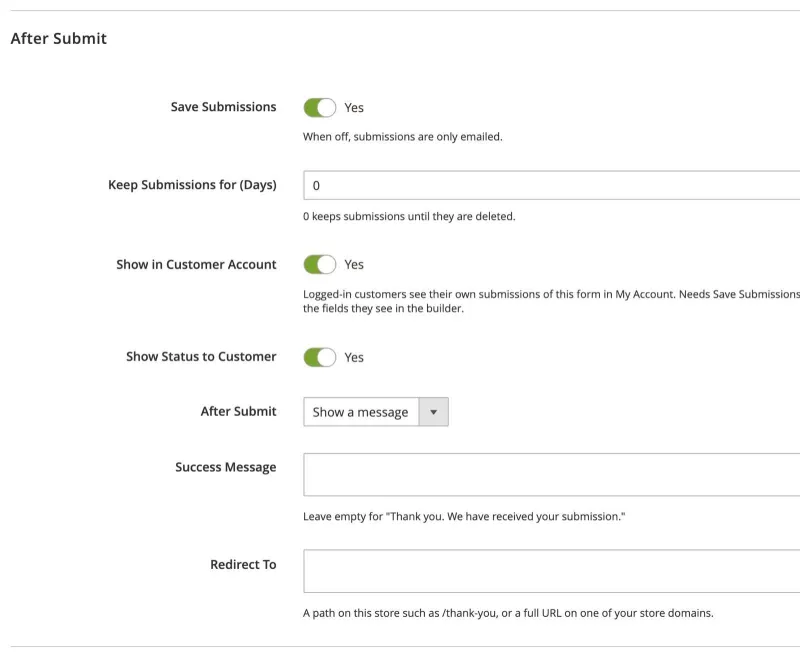
| Field | Description |
|---|---|
| Save Submissions | When off, submissions are only emailed. File fields need this on. Default: Yes |
| Keep Submissions for (Days) | Submissions older than this are deleted automatically, with their files. 0 keeps them until they are deleted. Default: From the configuration (0) |
| Show in Customer Account | Logged-in customers see their own submissions of this form in My Account. Needs Save Submissions. Default: No |
| Show Status to Customer | Shows the submission status in My Account. Default: Yes |
| After Submit | Show a message, or go to a page. Default: Show a message |
| Success Message | Leave empty for "Thank you. We have received your submission." Default: (empty) |
| Redirect To | A path on this store such as /thank-you, or a full URL on one of your store domains.Default: (empty) |
My Account > My Submissions
- Customers see the date, the form, the status (if you allow it), the fields marked Visible to Customer, and their files.
- They never see internal notes, the assigned admin, IP address, browser, source page or hidden fields.
- Only submissions sent while logged in appear. Turning the setting off hides them at once; nothing is deleted.
Notifications and emails
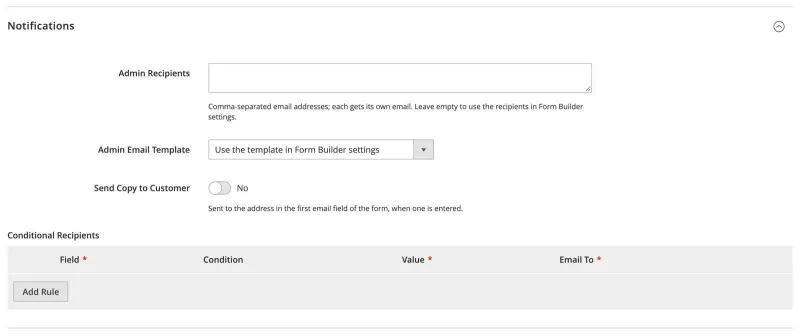
| Field | Description |
|---|---|
| Admin Recipients | Comma-separated email addresses; each gets its own email. Leave empty to use the recipients in the configuration. Default: (empty) |
| Admin Email Template | Template of the admin notification; empty uses the configuration. Default: (empty) |
| Send Copy to Customer | Sends a copy to the address in the first email field of the form, when one is entered. Default: No |
| Customer Email Template | Template of the copy; empty uses the configuration. Default: (empty) |
| Conditional Recipients | Also email someone when an answer matches, for example Topic equals Sales > sales@your-store.com. Up to 20 rules per form, one condition each. Default: None |
- The admin notification contains every answer and has its reply-to set to the customer.
- Copy and change the templates "Form Builder: New Submission (Admin)" and "Form Builder: Copy of Submission (Customer)" under Marketing > Email Templates > Add New Template > Load Template, then choose your template in the configuration or per form.
- A failed email is logged in
var/log/system.logand never loses the submission.
Design, spam and limits
Design
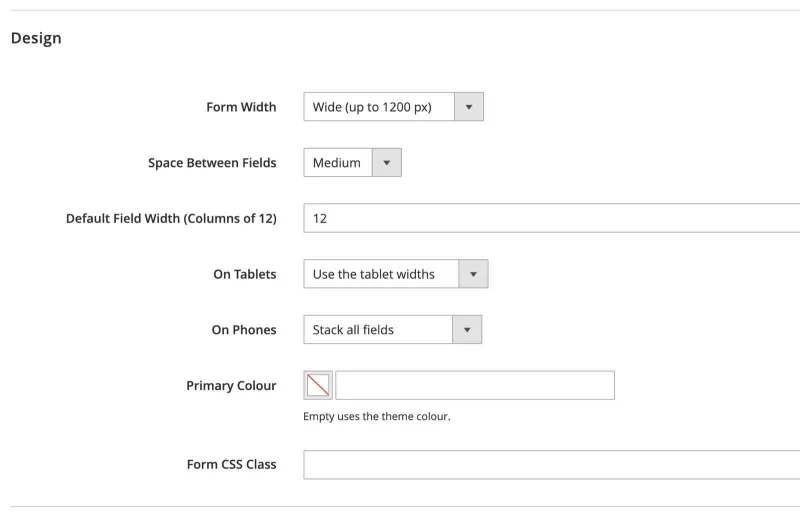
| Field | Description |
|---|---|
| Form Width | Full width of the page, Wide (up to 1200 px), Medium (up to 960 px) or Narrow (up to 640 px). A form narrower than the page is centred. Default: Wide |
| Space Between Fields | None, Small, Medium or Large. Default: Medium |
| Default Field Width (Columns of 12) | Width of new fields. Default: 12 |
| On Tablets | Use the tablet widths, or the desktop widths. Default: Use the tablet widths |
| On Phones | Stack all fields, or use the mobile widths. Default: Stack all fields |
| Primary Colour | Colour of buttons and the progress header. Empty uses the theme colour. Default: (empty) |
| Form CSS Class | Extra class on the form for your theme's styles. Default: (empty) |
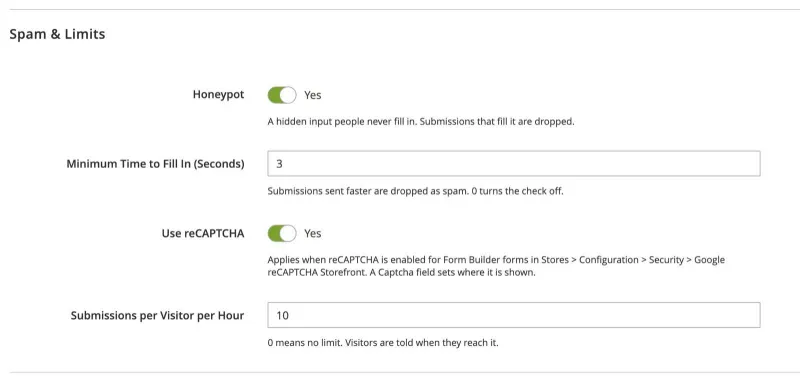
Spam & Limits
| Field | Description |
|---|---|
| Honeypot | A hidden input people never fill in. Bots that fill it get a normal thank-you message, but nothing is saved or sent. Default: Yes |
| Minimum Time to Fill In (Seconds) | Submissions sent faster are dropped the same way. 0 turns the check off. Default: 3 |
| Use reCAPTCHA | Applies when reCAPTCHA is enabled for Form Builder forms (see Google reCAPTCHA). A Captcha field sets where it is shown. Default: Yes |
| Submissions per Visitor per Hour | 0 means no limit. Visitors are told when they reach it. Default: 10 |
File uploads
File upload and Image upload fields take files by drag and drop or a Choose files button. For each field you choose the allowed extensions (from a safe list), the maximum size and the maximum number of files.
- Every file is checked on the server: the extension, the size, and that the content really is that type.
- Script and executable types (php, phtml, phar, html, svg, js, exe, sh and similar) are always refused.
- Images (jpg, png, gif) are re-saved, which removes hidden data such as the camera location (EXIF). Images wider than 2400 px are resized in the browser first.
- Files are stored in
var/mxw_formswith random names, never underpub/, and are downloaded as attachments, never shown in the browser. - Files that were uploaded but never submitted are deleted after 24 hours by cron.
- File fields need Save Submissions on (an email-only form has nowhere to keep files).
Showing a form
A form appears only when it is active, assigned to the store view and to the customer's group, and Form Builder is enabled for that store view. Otherwise its page shows "Page not found" and a widget shows nothing.
| Where | How |
|---|---|
| Its own page | https://your-store.com/forms/{code} |
| A CMS page or block | Content > Pages (or Blocks) > edit > Insert Widget > Magexweb Form > choose the form |
| A product page | The form's Product Enquiry settings (see Product enquiry forms) |
| A theme layout | The block Magexweb\FormBuilder\Block\Form with the argument identifier |
Form pages and widgets work with Magento's full page cache; saving a form refreshes the cached pages that show it. Logged-in customers get their name and email filled in.
CMS widget
- Open Content > Pages (or Content > Blocks) and edit the page or block.
- Click Insert Widget in the editor. In Page Builder, add an HTML Code or Text element first and insert the widget there.
- Choose Magexweb Form as the Widget Type, pick the form and click Insert Widget.
You can also type the directive into the content, where contact-us is the form's code:
{{widget type="Magexweb\FormBuilder\Block\Form" identifier="contact-us"}}Note: The widget cannot be used in emails.
Layout XML
Developers can place a form in any layout handle with the Form block and the form code (or form_id):
<block class="Magexweb\FormBuilder\Block\Form" name="my.form">
    <arguments>
        <argument name="identifier" xsi:type="string">contact-us</argument>
    </arguments>
</block>
Product enquiry forms
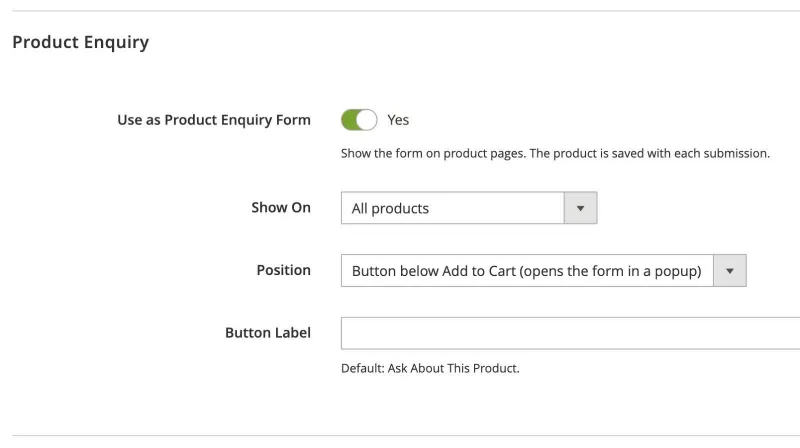
Let shoppers ask about a product from its page. Open the form and expand Product Enquiry:
| Field | Description |
|---|---|
| Use as Product Enquiry Form | Shows the form on product pages. The product is saved with each submission. Default: No |
| Show On | All products, Products in selected categories (products in their subcategories count too) or Selected products (search by name or SKU). Default: All products |
| Position | Button below Add to Cart (opens the form in a popup) or Product tab. Default: Button below Add to Cart |
| Button Label / Tab Label | Empty uses "Ask About This Product" or "Product Enquiry" in the shopper's language. Default: (empty) |
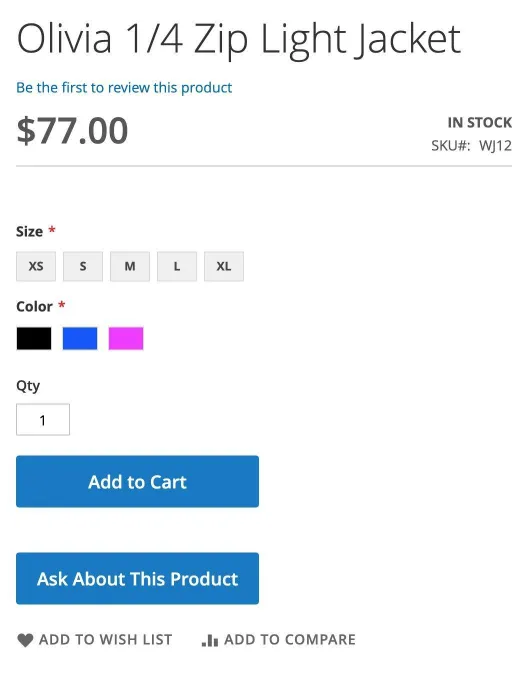
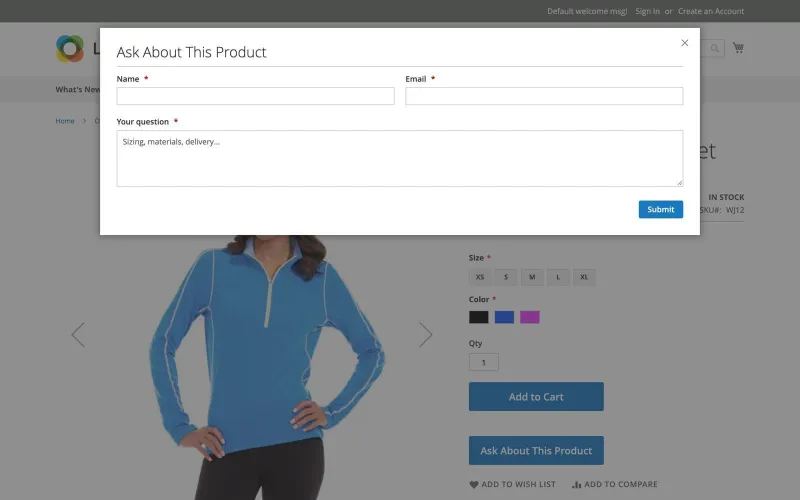
Button below Add to Cart: the button uses the theme's primary button style and opens the form in a popup:
Product tab: the form appears in its own tab next to Details and Reviews:
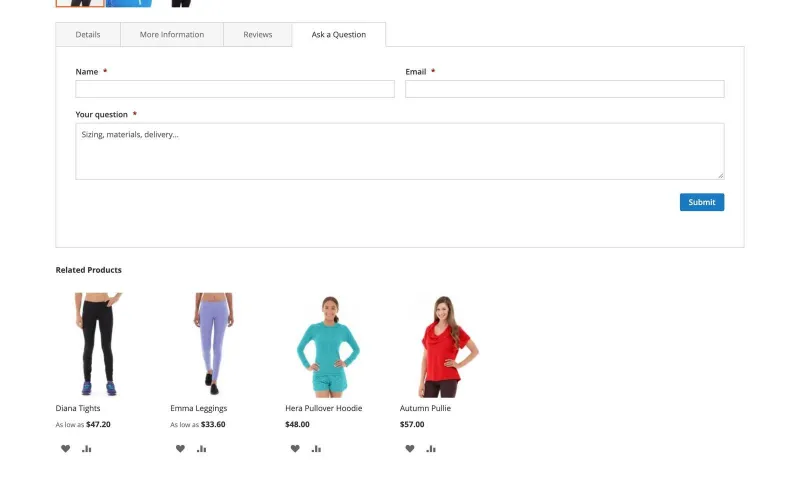
- The form still has to be active and assigned to the store view and customer group.
- If several enquiry forms match a product, each gets its own button or tab.
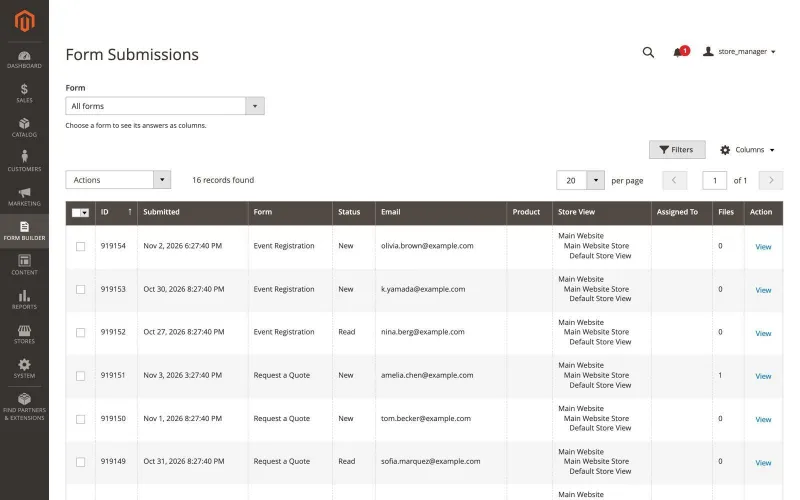
- Each submission remembers the product: its name and SKU are on the submission page, in the Product column of the submissions grid (add Product SKU with Columns), in both emails and in My Account.
Submissions
Form Builder > Submissions lists every submission; the menu shows how many are new. Choose a form above the grid to see its answers as columns (up to 40), and filter or sort on them.
Viewing a submission
Click View to see the answers (with the labels as they were submitted), files, consent texts, and details such as store view, customer, source page, campaign (UTM) values and, for a product enquiry, the product. Opening a new submission marks it Read.
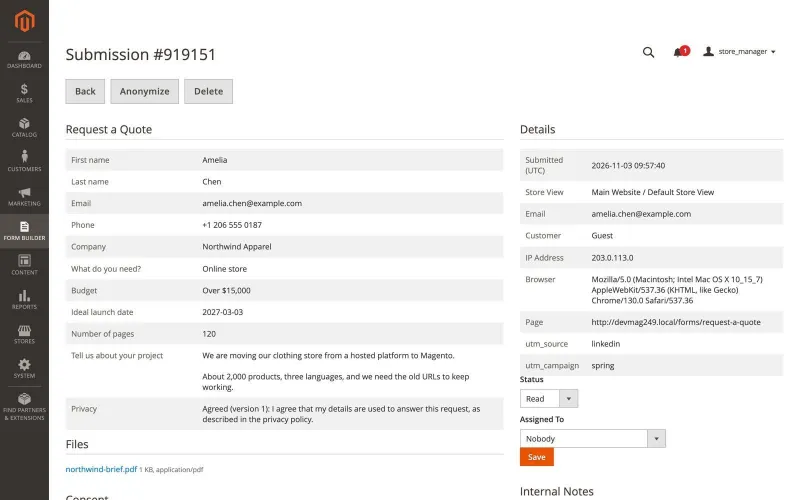
- Status: New, Read, Replied or Spam.
- Assigned To: a colleague who handles the submission.
- Internal notes: notes for your team. Customers never see them.
Mass actions and export
- Mass actions work on the selected rows, or on everything the filters match: change status, export to CSV or Excel, anonymize, delete.
- Export: CSV (opens in Excel with accents intact) or Excel XML. Values that a spreadsheet would run as a formula are made safe.
- Delete removes the submission, its answers, files and notes. Anonymize removes every answer, file and personal detail and keeps the fact that a submission was made.
- Customer page: Customers > All Customers > edit > Form Submissions shows that customer's submissions.
Privacy
- IP address: stored as a keyed hash (default), truncated, or not at all.
- Retention: each form deletes its submissions after a number of days (After Submit > Keep Submissions for (Days)); 0 keeps them. Deleted submissions take their files with them.
- Anonymize (on a submission or as a mass action): removes every answer, file and personal detail.
- Consent fields keep the text and version agreed to, shown on the submission page.
- Right to erasure: the command below finds every submission with an email address (as the submitter or in any email answer).
| Command | Purpose |
|---|---|
php bin/magento formbuilder:submissions:erase name@example.com | Shows how many submissions have that address |
php bin/magento formbuilder:submissions:erase name@example.com --yes | Deletes them |
php bin/magento formbuilder:submissions:erase name@example.com --yes --anonymize | Anonymizes them instead |
The extension loads no external scripts, fonts or styles, except Google reCAPTCHA when it is enabled and the Google Maps JavaScript API when address autocomplete is set up.
Permissions
In System > Permissions > User Roles > Role Resources, each area is a separate permission, so you can give staff exactly the access they need:
| Resource | Allows |
|---|---|
| Form Builder > Forms | View forms |
| ... Save Forms | Create and edit forms |
| ... Delete Forms | Delete forms |
| Form Builder > Submissions | View submissions, change status and assignment, add notes, download files |
| ... Export Submissions | Export submissions (CSV, Excel XML) |
| ... Delete and Anonymize Submissions | Delete and anonymize submissions |
| Stores > Configuration > Form Builder Configuration | Change the module settings |
REST API
All endpoints are under /rest/V1/formbuilder and need an admin or integration token (Authorization: Bearer <token>) with the matching Form Builder permission.
| Endpoint | Description |
|---|---|
GET /forms, /forms/:formId | List or get forms (permission Forms) |
POST /forms, PUT /forms/:formId | Create or update a form (Save Forms) |
DELETE /forms/:formId | Delete a form (Delete Forms) |
GET /submissions, /submissions/:submissionId | List or get submissions (Submissions) |
DELETE /submissions/:submissionId | Delete a submission (Delete and Anonymize Submissions) |
- PUT may send only the values that change. Send steps only to replace the form's step and field tree.
- Lists accept
searchCriteriawith a page size of 1 to 200 (default 20). Lists do not include the steps or the answers; get the single item for those. - The same services are available to developers as PHP service contracts.
Cron jobs and commands
| Cron job | Schedule | Purpose |
|---|---|---|
mxw_formbuilder_cleanup_uploads | Hourly (minute 15) | Deletes uploads that were never submitted (older than 24 hours) |
mxw_formbuilder_delete_expired_submissions | Hourly (minute 35) | Deletes submissions older than their form's retention period |
consumers_runner (Magento) | Every minute | Sends queued emails, when Email Delivery is set to the message queue |
Uninstallation
To switch the extension off but keep everything, set Configuration > General > Enable Form Builder to No, or run php bin/magento module:disable Magexweb_FormBuilder. Forms and submissions are kept.
To remove it completely:
- Export the submissions you want to keep.
php bin/magento module:disable Magexweb_FormBuilder- Composer:
composer remove magexweb/formbuilder. Manual installation: delete theapp/code/Magexweb/FormBuilderfolder. - Optionally delete the data: the tables starting with
mxw_form, the configuration (core_config_datapaths starting withmagexweb_formbuilder/), the module'ssetup_modulerow and the foldervar/mxw_forms/. php bin/magento setup:upgrade,php bin/magento setup:di:compileandphp bin/magento cache:flush
Important: Back up your database and the var/mxw_forms folder before deleting data: forms, submissions and uploaded files are deleted permanently.
Troubleshooting and FAQ
| Question | Answer |
|---|---|
| The form page says "Page not found" | Check that the form is enabled and assigned to the store view and customer group, and that Form Builder is enabled for the store view. Logged out, you are in the NOT LOGGED IN group. |
| A widget shows nothing in a CMS page | The same checks as above. If it still shows nothing, flush the cache (System > Cache Management). |
| Changes do not show on the storefront | Save the form again. If you changed templates or styles, flush the cache. |
| The enquiry button or tab does not show on a product | Use as Product Enquiry Form is on, the form is active and assigned, and the product is in a selected category (or its subcategories) or is a selected product. A custom theme must keep Magento's product info and product tabs blocks. |
| No admin email arrives | Recipients are set (form or configuration); Magento can send email at all; with queued delivery, cron runs. Failures are in var/log/system.log. |
| "Your session has expired" on submit | The page was open for a long time or cookies are blocked; reload the page. |
| An upload is refused | The extension is not allowed for the field, the file is larger than the limit (also check PHP's upload_max_filesize and post_max_size), or its content does not match the extension. |
| Address suggestions do not appear | Provider and key are set, and the key allows your domain and the Places API (New). |
| Too many submissions from bots | Turn on reCAPTCHA and lower Submissions per Visitor per Hour. |
Old uploads pile up in var/mxw_forms/tmp | Cron is not running. Run php bin/magento cron:run or install the cron jobs. |
Support
For help, contact Magexweb at info@magexweb.com. Please include your Magento version, PHP version, the extension version and a description of the problem, and if possible the relevant lines of var/log/system.log and var/log/exception.log.